Quite a while ago my daughter, Miriam, sent me an image of a picture constructed using Mardi Gras beads. She knew I had a crystal bowl (a wedding gift from long ago) filled with strings of shiny, colorful beads which came out every spring to decorate the dining room table. I guess she though I could could do something “creative” with them. I remembered this idea, but never took the time to do anything about it.
A weekend ago, the bug hit and I decided to excavate this idea. I went to the still new local Michaels. I had worked there for about 5 months when they opened, but that’s another story. I was looking for some sort of frame for the beads. I found a nice shadowbox with a fabric-covered backing. Better yet, they were priced just right – buy one, get two free! I think they’ve been marked down since to an even lower price. But, I got what I wanted when I had the inspiration and time.
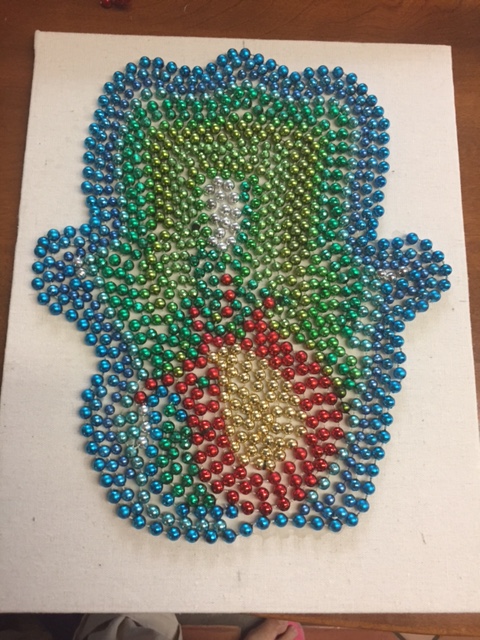
Next was to decide on the design(s) using the stings of bright beads I’d accumulated over the years. My go-to design is the hand of Fatima/hamsa which I first encountered in Morocco. I was drawn to this image because I find it to be essentially feminine/ feminist. To me, it also represents North African Sephardic Jewry, although it seems everyone and their sister wears it now, along with the ubiquitous evil eye bead (po po, po po). That was emerged on the first mosaic. The second was a free form pattern guided by the beads. Since I’d deleted the original idea sent by my daughter, I Googled “Mardi Gras Throw Art” and looked at images to stimulate my thoughts.
How did I construct these pieces? I assembled the beads. I also picked up a cardboard box lid on which layout them out and test my ideas. I assembled some tools – a Japanese clippers, Elmer’s glue, and straight pins. The clippers came in handy when I needed to cut the strings of beads to create the patterns. I used the Elmer’s liberally to stick the beads down and the pins held some beads in place until the glue took hold. Kaitlin (who helped make this blog possible), on seeing the mosaics, said she’d take the high road and sew the beads to the backing. I’m not sure how possible that would be. Either using a curved leather needle to pick up the fabric backing or punching through the backing could make that possible.
Then I laid out the beads in the order of the colors I wanted in the box lid, chose a starting point on the final backing, and laid down a really liberal, thick thread of glue. Next, I laid down the first row of beads, cutting the strings as I went along. This process – glue, place, cut – followed til I was satisfied with the outcome. When I saw what seemed to be a hole, I cut one or two beads to fill the hole.
As I went along, I coaxed the rows of beads as close to each other as possible, often urging them to stay with a straight pin. [Note: be careful when removing the pins, they are often embedded in the dried glue and lift off the beads when removed. Remove them gently and slowly].
Design Note: Be careful to leave room for the frame at the edge of the backing. Beads that go the edge will obstruct the frame.
Final Note: when finished, let the mosaic set overnight to give the glue time to dry. Miriam phoned while I was doing the first mosaic. I was so excited I tried to place it in the frame and …. most fell off of the backing – a huge sticky mess, of glued-together beads. I was able to reassemble it in a good facsimile of the original!
My husband liked the two final mosaics, but said he did not want to live with seeing them regularly. The hamsa went on a wall with other hamsas (more on that another day). The free-form creation is adding color into a small alcove above my collection of miniature baskets and heart-shaped boxes.
What next? Cheers ~
